2. Payment Management
2.1. Dashboard
The Cashier's dashboard is an information management tool that visually tracks, analyzes, and displays key performance indicators (KPIs), metrics, and important data points for each brand, helping to measure successes and identify areas for improvement.
It is fully customizable to meet the specific needs of the company and its departments.

- You can access the dashboard from the top left corner of the screen.
- You can choose the dashboard currency (USD, EUR, GBP).
- The dashboard's top section includes 4 key components: today's and yesterday's sales volume, and the transaction approval ratio.
Dashboard filters:

- Countries: A dropdown list of all the brand’s supported countries, with the option to select multiple countries.
- Payment providers: A dropdown list of the brand's active PSPs and APMs, with the option to select multiple providers.
- Date: The default date is set to "today." Clicking the filter opens a calendar, allowing you to select a date range by choosing a start ("from") and end ("to") date.
- Deposit type: A dropdown list with the following options: All (default), FTD, and STD.
Dashboard graphics:

- Transaction status: A pie chart displaying the number of transactions for each deposit status.
- Transaction approval ratio: Two lines representing the approval ratio for each date.
When a date range is selected, the lines will display data from the first selected date ("from") to the last selected date ("to").

- Decline reasons: The system generates a list of decline reasons based on the current filter settings and shows the top reasons as percentages. The "other" section displays less common decline reasons.

- Transaction volume: Displays the volume of transactions by payment processor.
- Successful transactions: Shows the number of successful transactions by payment processor.

- Card types: A pie chart showing the number of transactions for each card type.
- Transaction sources: A pie chart displaying the number of transactions by source (back-office, website, mobile web, mobile app).
- Transaction locations: A map showing all deposit locations.
2.2. Transactions
This section contains the following tabs:
- All transactions
- Deposit form

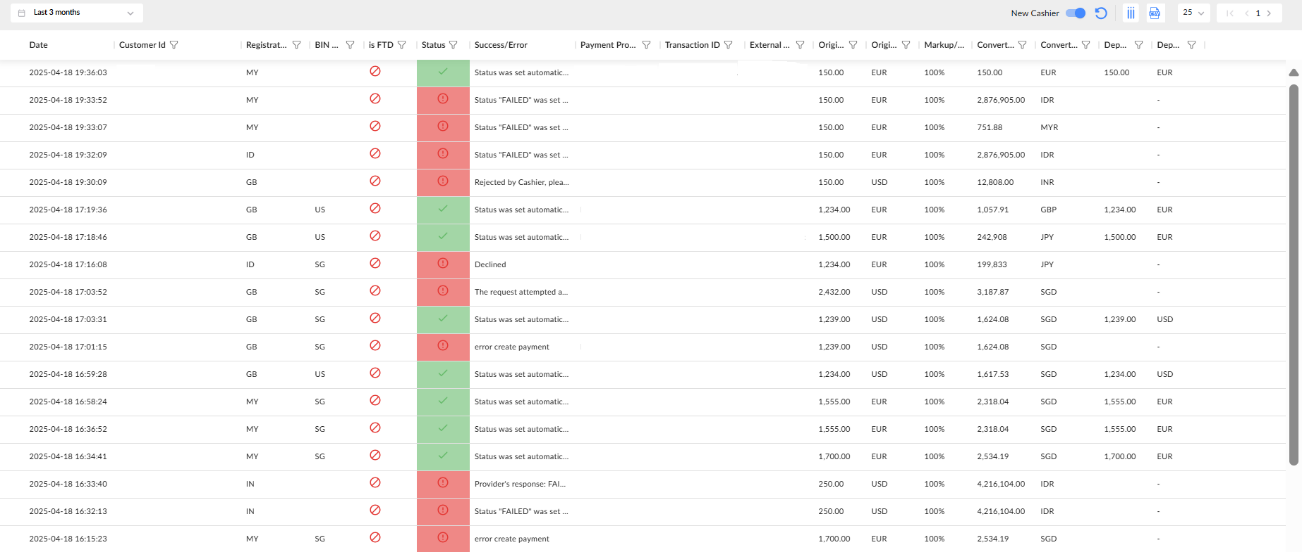
2.2.1. All transactions
The All Transactions tab displays all transaction records, including time, status, source, and other relevant information. The data is presented in a customizable table, allowing users to adjust the column order and visibility.
Transaction sorting:
- To sort the data, click on the column title.
- Arrows (up or down) will appear next to the column title.
- Up arrow: Sorts the data in ascending order (e.g., from lowest to highest).
- Down arrow: Sorts the data in descending order (e.g., from highest to lowest).

Transaction filtering:
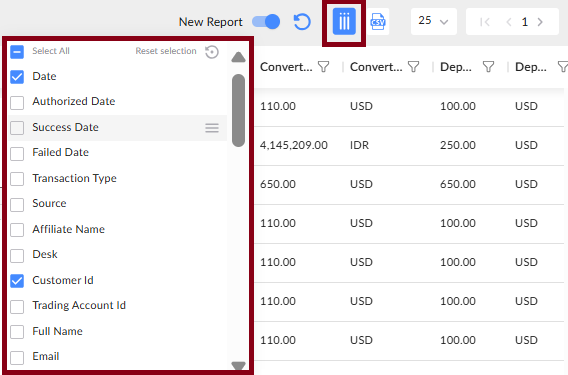
You can filter columns (show/hide) and their data according to your preferences.
To filter columns:
- Click Filter columns in the top-right corner of the page.
- From the dropdown list, select the columns you want to display.
- The dropdown will close, and the selected columns will appear on the page.
- To hide columns, repeat the process and uncheck the columns you no longer wish to display.
The fields Gateway Payment Method Transaction ID and Gateway Payment Method currently function only for LatamCashier.
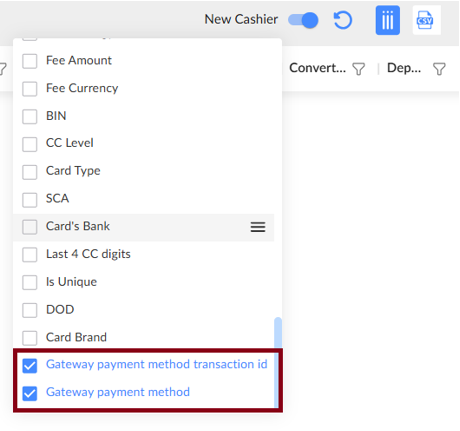
The fields Gateway Payment Method Transaction ID and Gateway Payment Method are included in PENDING, SUCCESS, and FAILED CRM notifications, with the value sent in the 'processorTransactionId' field.

To filter data:
- Select the column and click the Filter icon next to its title.
- Enter the value you want to filter (e.g., registration country).
- Click Apply filter.
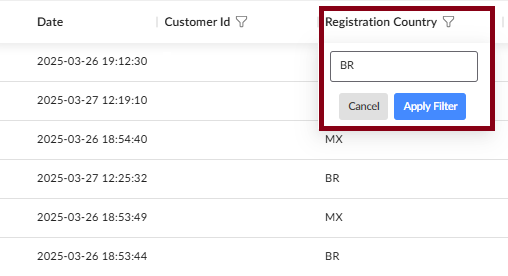
- You can filter multiple columns in the same way.
- To remove a filter, click the "X" next to the filter.
- The table will automatically update and sort each time a filter is added or removed.
- To reset all filters, click Clear all.
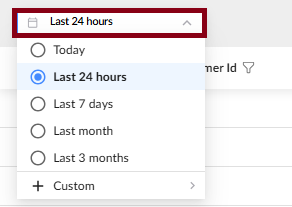
You can filter a list of transactions by date.
You can also filter transactions by Customer ID. Cashier displays all lifetime transactions when the ‘Customer ID’ filter is applied and ‘Show all transactions’ is selected.

The complete list of customer transactions is visible only if the ‘Skip date range in back office’ option is enabled in the brand settings.
You can generate a list of all transactions and export it.
![]()
Viewing transaction details:
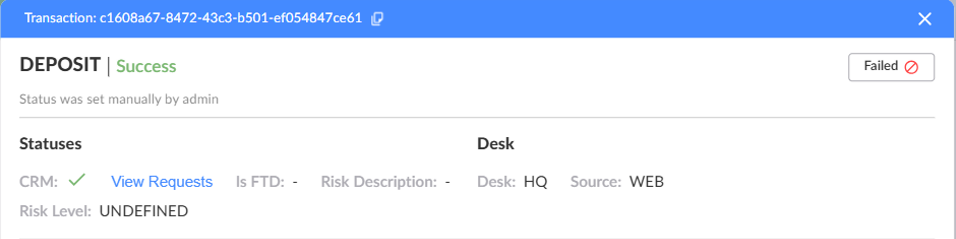
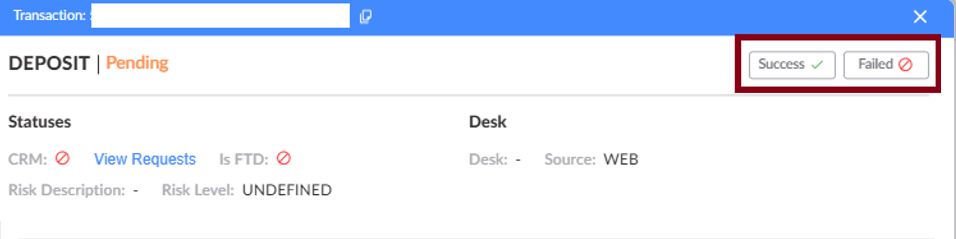
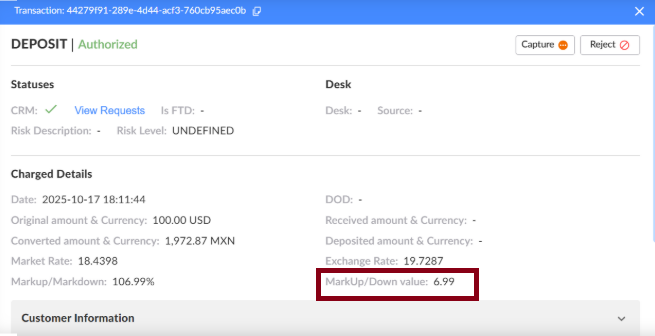
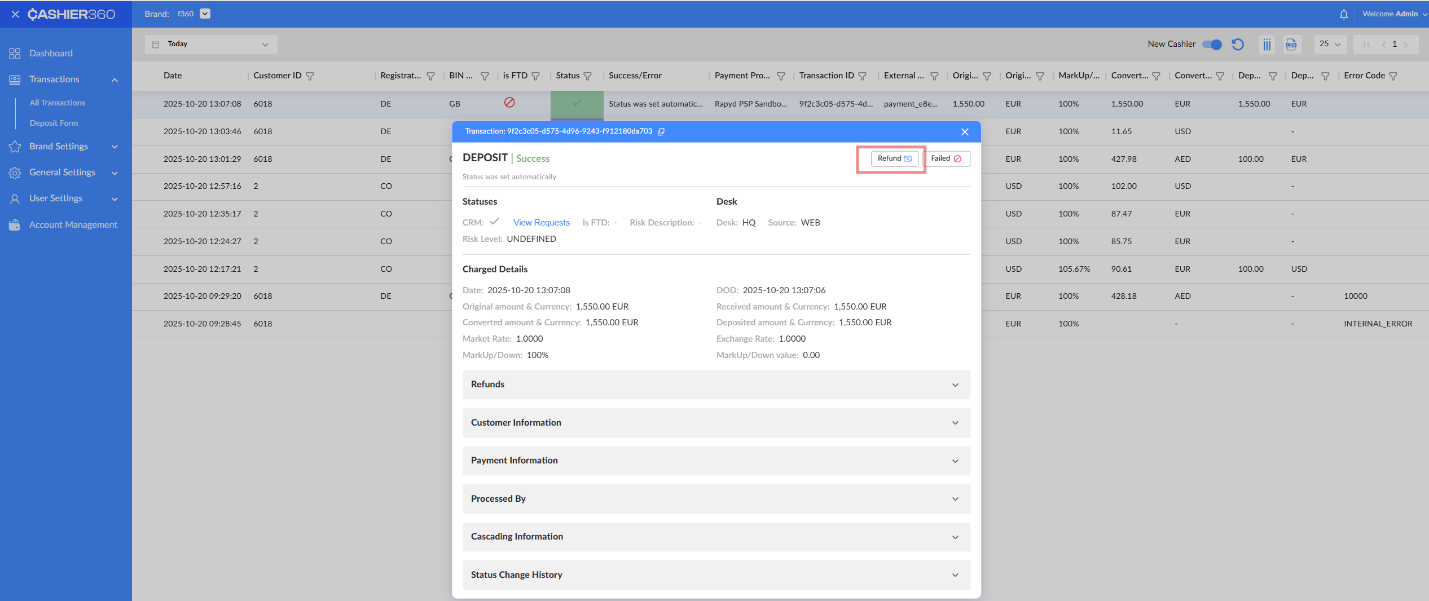
Click on a transaction record to open a popup with additional details. If the transaction status is "Pending," you can manually update it by clicking either the Success or Failed button.
The MarkUp/Down value shows the absolute amount of markup or markdown in the original currency, calculated as (Original Amount × MarkUp/Down %) / 100 - Original Amount. It is available in the transaction grid (optional column), transaction card, CSV export (if enabled), and is also sent to CRM.
Automatic status updates:
The system automatically scans all pending transactions, sends requests to the relevant payment provider for the latest status, and updates the transaction statuses accordingly.
2.2.2. Requesting a refund
Refunds are only available for providers that support this feature.
- Click on a transaction record to open a popup with additional details.
- In the popup, click the Refund button to request a refund.
- Specify the refund amount, then click the Refund button again to confirm the action.
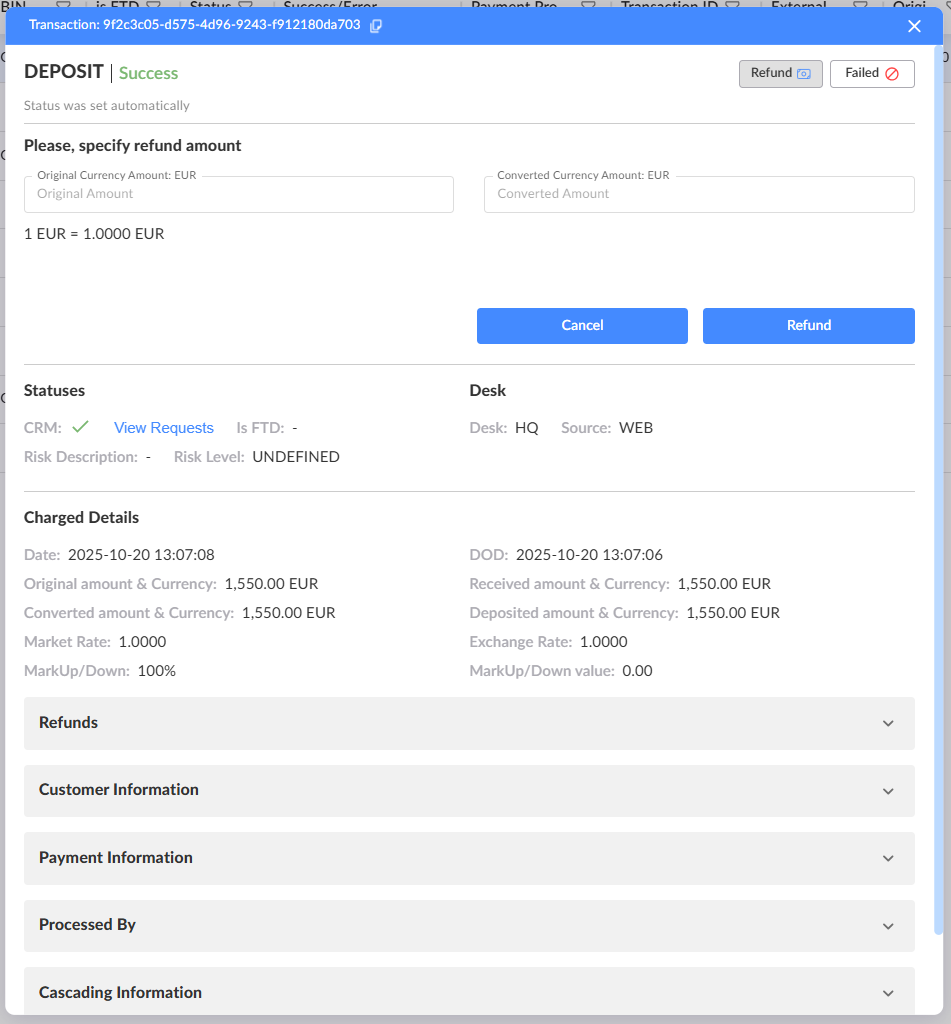
- Review the refund details in the Refunds section of the transaction record.

- All refunds appear in the transaction list, showing full details for each refunded transaction.

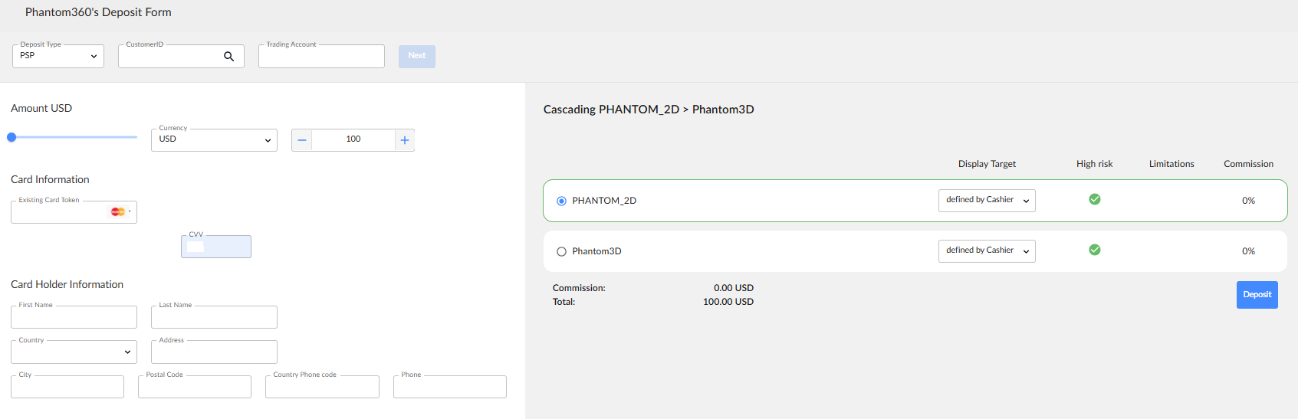
2.2.3. Deposit form
The deposit form enables back-office agents to process deposits on behalf of the brand's customers.
Payment requests from the Deposit Form use the customer’s last known IP address and country. If the customer has no transactions from the Deposit Form, the back office (BO) user’s IP address and country are used instead.
Deposit form – initial state:

To complete a deposit, the back-office agents perform the following steps:
- Select deposit type and enter customer details (customer ID and trading account).
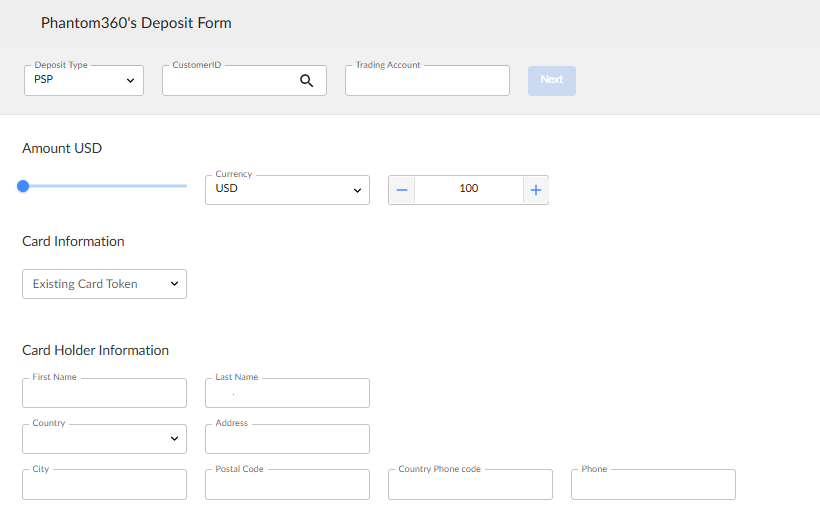
- Fill in card token and select cascading.
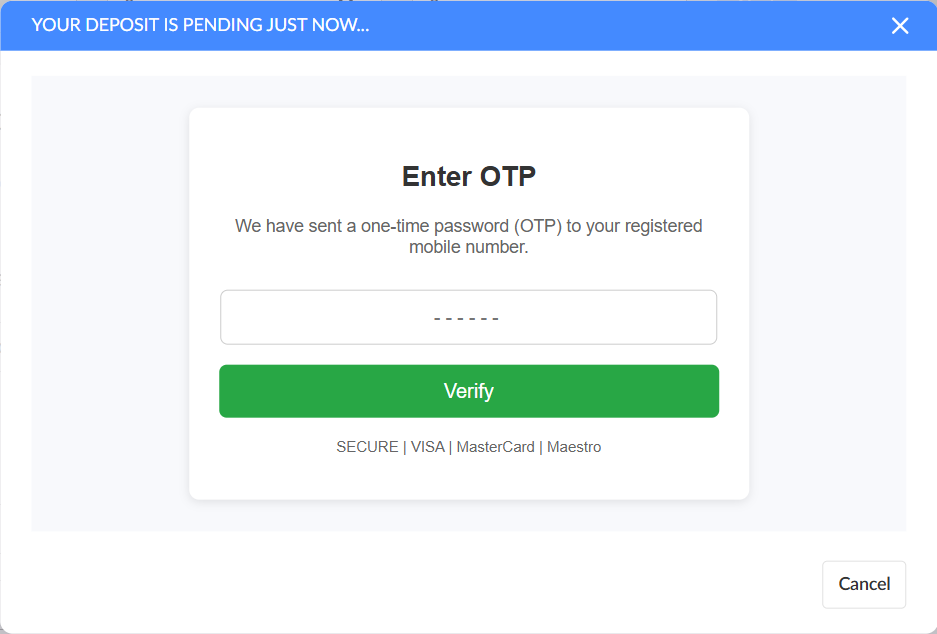
- Enter the confirmation code sent to the mobile phone.
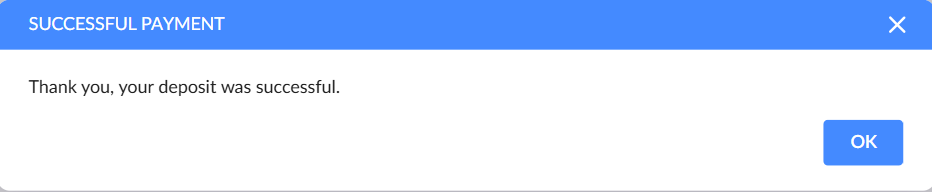
- Once the deposit is processed, a successful payment popup will appear.