1. Getting Started
1.1. Currency settings
Configuring the currency settings in Cashier V2 ensures that payment processing aligns with the business needs. This setup determines the suggested, minimum, and maximum amounts displayed to customers on the deposit page, based on currency, country, and affiliate.
1.1.1. Steps to configure currency settings
To access currency settings:
Navigate to Brand Settings > Currency Settings in the back-office menu. Then, click Add New Currency.
This option is available under certain user roles.

1.1.2. Steps to configure currency settings
- Define supported currencies
Select the currencies your business will support for transactions. For example, the currencies used for the items, services, and products your business offers.
- Specify supported countries
Select the countries where your business will operate. For example, locations where you offer products, services, or support.
The affiliate name is optional and applies only to customers of affiliated companies.
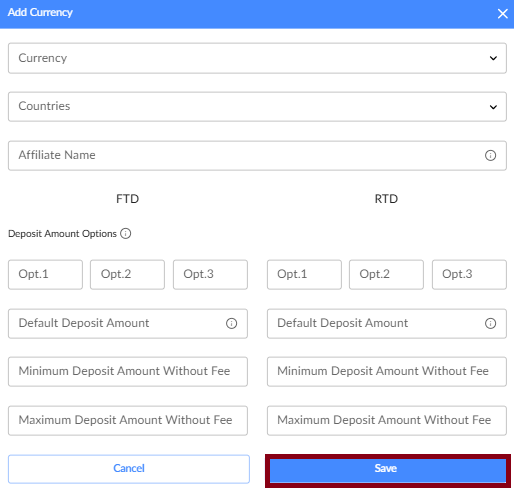
- Configure FTD/RTD settings
Set up separate configurations for First-Time Deposit (FTD) and Recurring Deposit (RTD). This includes:
- Deposit amount options: Define three preset deposit amounts for the deposit page, arranged from smallest to largest.
- Default deposit amounts: Choose the suggested amounts to display for a customer’s first transaction.
- Minimum and maximum deposit amounts: Configure high-level minimum and maximum amount limits.
- Save and apply changes
Review your settings. Click Save to apply changes across the system.
Supported currencies and countries, along with configurations for suggested, minimum, and maximum amounts, can be defined separately for each affiliate.
1.1.3. Currency management
Currencies can be edited or deleted.

Filters can be set based on currency, country, and affiliate name.

Your currency settings are now configured. Let's proceed with payment provider configurations.
1.2. Payment service provider (PSP) configuration
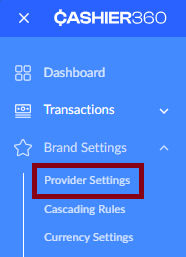
Navigate to Provider Settings in the back-office.
On this page, you can:
- add new payment providers.
- view all existing payment providers for the brand.
- view and manage the settings for each payment provider.
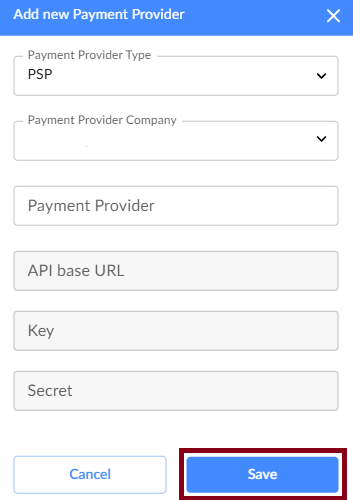
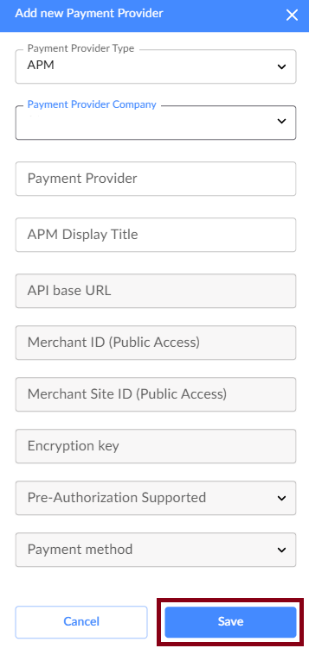
1.2.1. Adding a new PSP
- Click Add New Payment Provider.
- Choose PSP and select the payment provider company from the list.
- Enter the required API credentials and authentication details.
- Click Save to apply the changes and proceed to advanced settings.
1.2.2. Accessing PSP advanced settings
To access the advanced settings for the newly created PSP, click Edit on the right side of the payment provider list.

1. Configurations
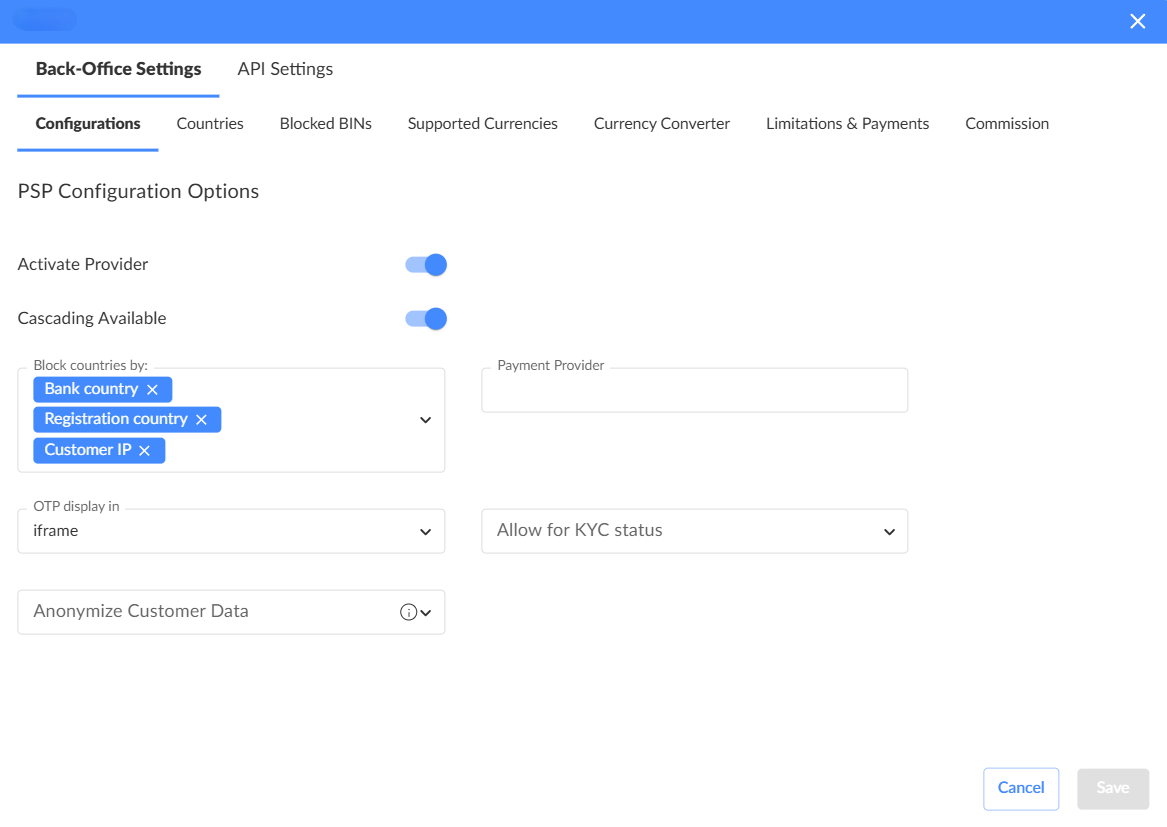
Block countries by
Set the criteria for blocking countries. You can choose from the registration country, bank country, or customer IP country.
OTP display in
Choose how the OTP (one-time password) window should be displayed during the 3DS challenge. You can select one of the following options:
- Iframe: The OTP window will appear on the same page as the deposit page.
- New tab: The OTP window will open in a separate tab to bypass security restrictions from issuer bank.
Anonymize customer data
Specify whether Cashier should anonymize customer data before sending it to the payment provider. You can select one of the following options:
- All: Both the phone number and email address will be modified.
- Email: The email address will be modified.
- Phone: The phone number will be shuffled.
Allow for KYC status
This setting maps statuses between the client CRM and the Cashier system. The mapping can be customized to fit the specific needs of the CRM.
2. Countries
Specify the countries where the PSP is allowed to process transactions. By default, all countries are enabled.
3. Blocked BINs
Add or remove BINs (bank identification numbers) to restrict certain payment methods from processing payments through the PSP.
4. Supported currencies
Set the currencies that the PSP can process. Ensure these currencies match the brand settings to prevent conversion issues.
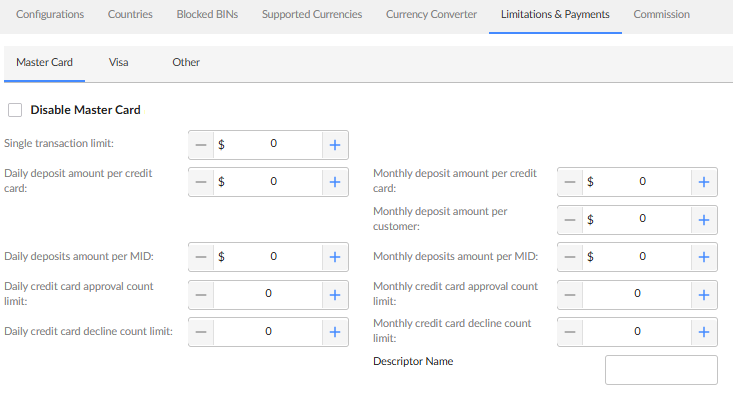
5. Limitations and payments
Follow these guidelines to configure limits for a specific provider:
- Set transaction limits based on customer, card, or region.
- Define the minimum and maximum deposit amounts for each specific provider.
- Limits can be configured independently, but validations are in place to prevent incorrect settings.
- Ensure the following relationships between transaction limits:
- The single transaction limit should be less than or equal to all other limits.
- The daily limit should be less than or equal to the corresponding monthly limit.
- The per credit card limit should be less than the per MID or per customer limits.
- The per customer limit should be less than or equal to the per MID limit.
- The approval count limits SUCCESS transactions.
- The decline count limits FAILED transactions.
- A value of '0' is considered as no limit.
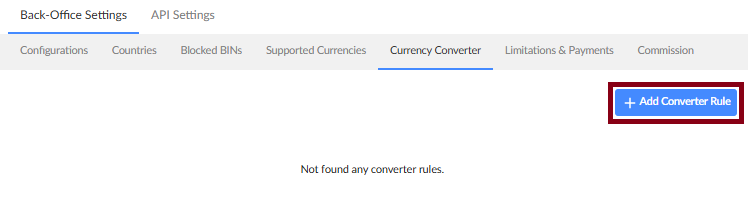
6. Currency converter
The currency converter allows you to set up specific rules for converting currencies between the currency of your products, services, and items (currency from) and the PSP’s currency (currency to).
This feature is available for both PSP and APM providers. Set it up individually for each payment provider.
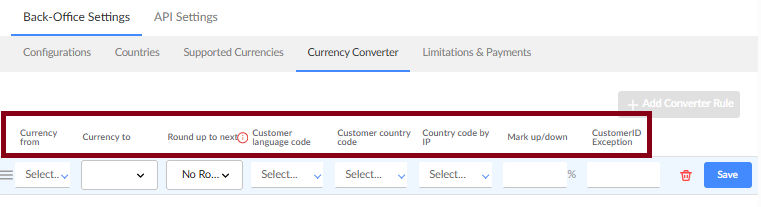
To add a new currency conversion rule, click Add Converter Rule button in the top right corner.
A blank row will appear in the main area with the following parameters:
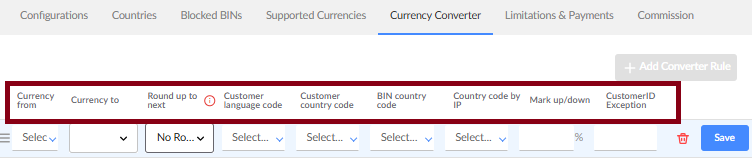
- Currency from: The first currency in the conversion pair (the currency of your products, services, or items). This is a required field, and you can select one or more currencies, or choose all currencies.
- Currency to: The second currency in the conversion pair (PSP payment provider). This is a required field, and only one currency can be selected here.
- Round up to next: The rounding method applied to converted currency amounts during payment processing. The available options specify how amounts are rounded: to the next whole number, tens, hundreds, thousands, or not rounded at all. This setting helps prevent mismatches between the Cashier and payment providers and ensures a smoother client payment experience.
- Customer language code: The language of the customer's account. This is a required field, and multiple languages can be selected.
- Customer country code: The customer's country of residence as provided during registration. This is a required field, and multiple countries can be selected.
- BIN country code: The country where the bank operates, based on its BIN.
- Country code by IP: The country where the customer is located based on their IP address. This is a required field, and multiple countries can be selected.
- Mark up/down: The cost of the currency conversion for the customer, expressed as a percentage. A value of 100% represents the actual currency exchange rate. If the field is left blank, the default value of 100% will be used. The smallest step is 0.01%. For more details, see the How mark up/down works section.
- Customer ID exception: The ID of the customer account to which the rule does not apply. This rule is used for specific customers or cases.
How mark up/down works
The mark up/down percentage defines how much the conversion will cost the user.
- If the percentage is less than 100%, it’s a mark-down, meaning the customer pays less than the official exchange rate.
- If the percentage is more than 100%, it’s a mark-up, meaning the customer pays more than the official exchange rate.
Example:
For EUR/USD pair, the “raw” exchange rate is 1.1 USD.
- Without the rule or with a 100% rate, the customer needs to sell 110 USD to buy 100 EUR.
- With a 110% mark-up, the rate becomes 1.1 * 110% = 1.21 USD. To buy 100 EUR, the customer needs to sell 121 USD instead of 110 USD.
- With a 90% mark-down, the rate becomes 1.1 * 90% = 0.99 USD. To buy 100 EUR, the customer now needs to sell 99 USD instead of 110 USD.
Once you’ve configured the rule, review your settings and proceed with configuring cascading rules for card payments.
1.3. Cascading rules
Cascading rules enable Cashier to determine the payment provider for a transaction by evaluating each customer deposit request against a set of criteria. These criteria (or rules) can include BIN Country, deposit amount, currency, and more.
Cascading rules ensure efficient transaction processing by selecting the most suitable payment provider for each transaction.
Cascading rules are applicable only for card transactions.
1.3.1. How cascading rules work
- The Cascading Rules feature checks each card payment request (e.g., deposit amount, BIN, customer email, etc.) against the active rules in the feature settings. The rules are applied in order, starting from the top of the list down to the default rule. Active rules are those listed above the default rule.
- If the request matches all the criteria of any listed rule, the payment provider for the transaction is chosen from the providers in the rule's Selected list, in order from top to bottom.
- If the request is declined by the chosen provider in the Selected list for any reason (e.g., suspicious transaction or the customer’s bank being blacklisted by the PSP), Cashier will attempt to process the payment with the next choice in the list. This continues until the transaction is accepted or all providers in the rule decline the request.
- If the request is declined by all the providers in the Selected list of the rule, Cashier will attempt to process the payment using a provider from the Selected list in the default rule. The default rule has no criteria and is placed at the bottom of the cascading rules list.
- If the request is declined by the default rule's PSP list, the transaction will be permanently canceled. The customer will be notified to retry the payment.
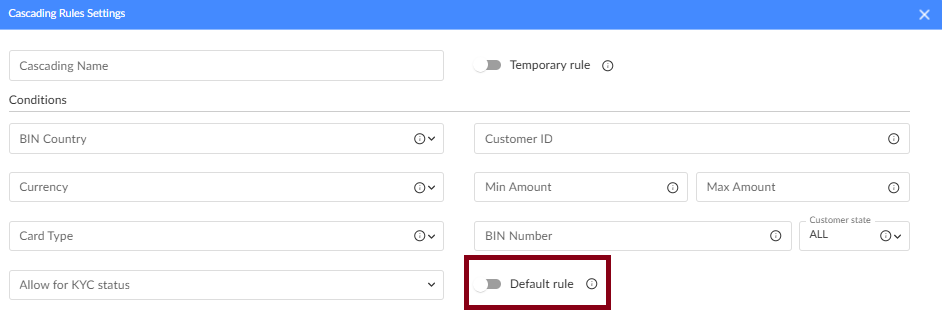
You can only have one default cascading rule ("No Conditions Found"). If you try to create another, you won’t be allowed.
The Default rule toggle controls this rule’s creation:
- Enabled: Allows creating the default rule if it doesn’t exist.
- Disabled: Blocks creation of rules without conditions.
If you try to add a rule without conditions before the default rule is created, you’ll be asked to either add conditions or mark it as the default rule.
1.3.2. Accessing cascading rules
To access the feature, click Brand Settings > Cascading Rules in the back-office menu.

Once you’re on this page, you can view a list of all existing cascading rules.
To filter the list, click the Add Filter button located at the top-left corner of the screen. Then, select your filter criteria from the list.
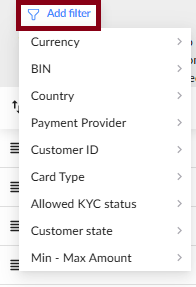
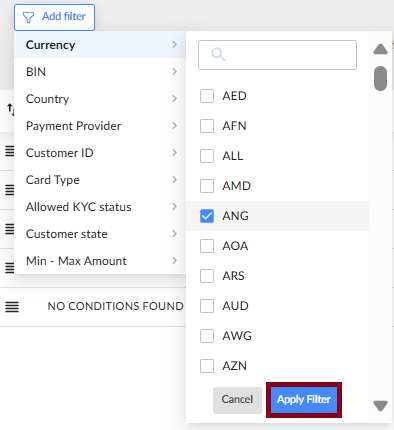
Choose the filters you need and click Apply Filter.
All the filters you’ve applied will be displayed on the left side of the Add Filter button. From there, you can remove each filter individually or you can clear all filters at once.

The order of rules in the list is important. The system applies the rules to payment requests in this order, from top to bottom. The default rule, typically placed at the bottom of the list, is a No CONDITIONS FOUND rule. Any rules listed below the default rule are considered inactive and are not applied by the system.
1.3.3. Adding cascading rules
To add a new rule, click the New Cascading Rule button at the top right. In the Cascading Rules Settings window, you can set the criteria and select the payment providers.
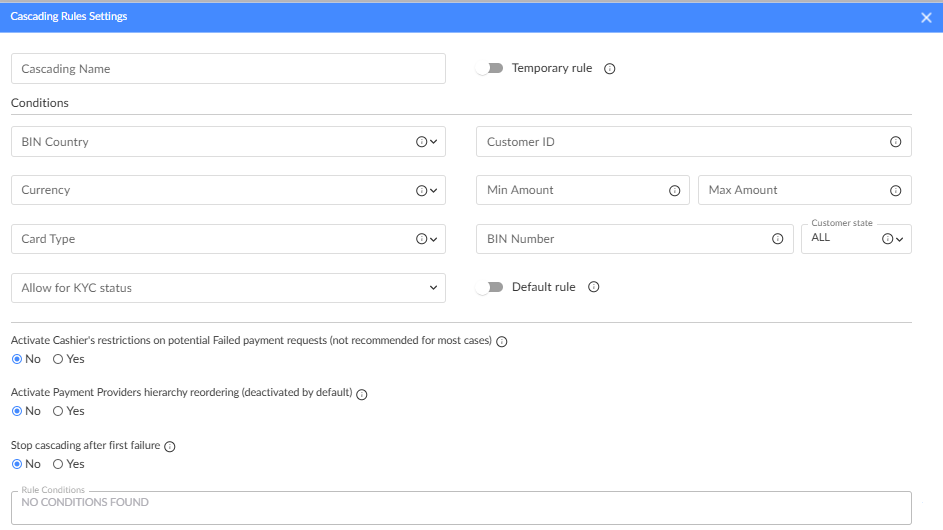
All fields are optional.
- Temporary rule: Create a rule that automatically expires at a specific date and time. The expiration is set to one hour after the next full hour (e.g., created on 10.06.2025 at 12:29, expires at 14:00).
- BIN country: Choose the country where the customer's bank is registered. Multiple options can be selected.
- Customer ID: Enter one ID per rule. The rule will only apply to the customer with that ID.
- Currency: Multiple options can be selected.
- Deposit amount: Specify a minimum, maximum, or a range for the deposit amount. The amount is set in USD, regardless of the selected currency.
- Card type: Multiple options can be selected.
- Allow for KYC status: Multiple options can be selected.
- BIN number: Enter one BIN per rule.
- Customer state: Choose whether the rule applies to first-time (FTD) or repeated (RTD) deposits.
- Rule condition: View the final condition that determines how the rule is applied. This is a read-only field.
- Activate Cashier's restrictions on potential failed payment requests (not recommended for most cases): Cashier’s internal cascading restrictions help prevent fraudulent activity and reduce the risk of chargebacks from the PSP due to repeated failed transaction attempts. By default, these restrictions are disabled (“No” selected). When activated (“Yes” selected), Cashier will log "transaction failed" messages from the PSP. After several repeated failures, the request will be blocked before being sent to the PSP. Select “No” to disable this restriction, allowing repeated deposit requests without Cashier’s internal limits.
- Activate payment providers hierarchy reordering (deactivated by default): This option allows Cashier to adjust the order of payment providers within the cascading rule based on previous failed attempts.
- The cascading rules have 4 providers: Provider 1, Provider 2, Provider 3, and Provider 4.
- If the first transaction attempt fails with Provider 1 and Provider 2, the process will stop due to a 3DS challenge failure on Provider 2.
- For the next transaction attempt with the same card, the order of payment providers will change based on the previous failures. For the next 3 hours, the providers will be used in the following order: Provider 3, Provider 4, Provider 1, Provider 2.
- The cascading rules have 4 providers: Provider 1, Provider 2, Provider 3, and Provider 4.
- If the first transaction attempt fails with Provider 1 and Provider 2, the process will stop due to a 3DS challenge failure on Provider 2.
- All subsequent transaction attempts will follow the same order of payment providers: Provider 1, Provider 2, Provider 3, Provider 4.
- Stop cascading after first failure: This setting determines whether the cascading process should stop after the first failed transaction attempt.
Cascading stops after the customer's first failed transaction. No other providers in the list will be tried.
All providers in the cascading list will be tried, even if some transactions fail.
- Payment providers: This section contains two lists: Available and Selected providers. To add a provider to the Selected list, use the controls on the screen or drag and drop it from the Available list. Deposit requests will only be processed according to the rules in the Selected list, in the order they are arranged.
The hierarchy in the Selected list is crucial for the correct execution of the rules. For more details, see How cascading rules work section.
To reset all rule data, click Clear located at the bottom-right side of the window.
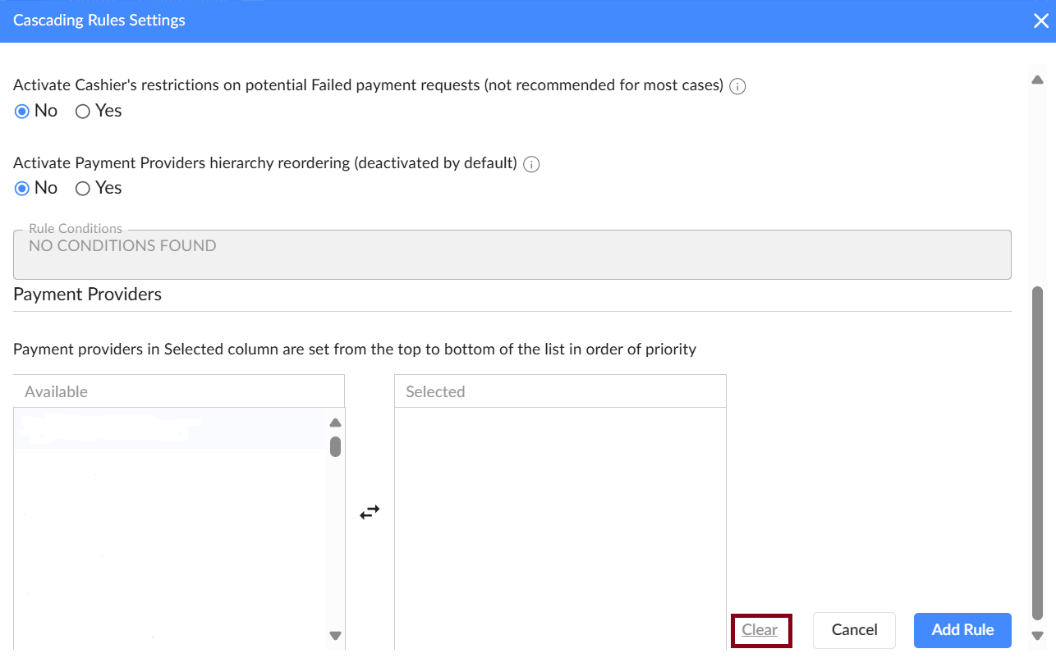
To save your rule, click Add Rule. The window will close, and the new rule will be added to the bottom of the list. To activate the new rule, move it above the NO CONDITIONS FOUND default rule.

The hierarchy in the cascading rules list is crucial for the feature to function correctly. The rules are processed in the exact order they are listed.
Any rule placed below the default rule (NO CONDITIONS FOUND) is inactive. To activate a rule, drag it above the default rule, arranging it in the desired order for processing payment requests.
For example, the rule highlighted in the screenshot is inactive, so Cashier will not apply it to any payment requests.

To manage existing rules, you can perform the following actions:
- Edit: Make changes to your rules and save them.
- Delete: Delete rules and confirm the deletion.
- Disable: Move the rule below the default rule to temporarily disable it, allowing you to restore it later if needed.

1.4. Alternative payment Method (APM) Configuration
To add an alternative payment provider:
- Navigate to Provider Settings in the back office.
- Click Add New Payment Provider.
- Choose APM and select the payment provider company from the list.
- Enter the required API credentials and authentication details.
- Click Save to apply the changes and proceed to advanced settings.
1.4.1. Accessing APM advanced settings
To access the advanced settings for the newly created APM, click Edit on the right side of the payment provider list.

1. Configurations
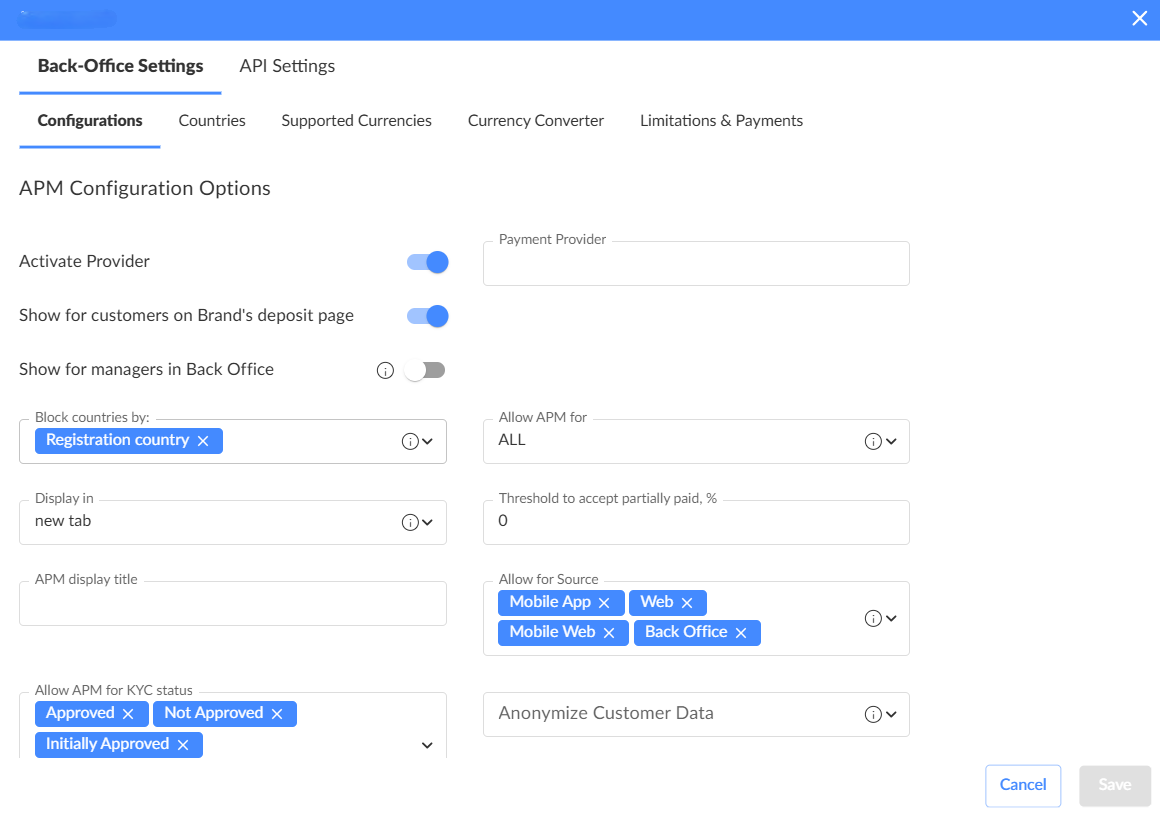
Block countries by
Set the criteria for blocking countries. Choose one or both of the following parameters: customer IP or registration country.
Allow APM by
Set the APM availability criteria on the customer’s deposit page. Choose one or both of the following parameters: customer IP or registration country.
Display in
Configure how the provider's page will appear to the customer. The following options are available:
- Iframe: The provider’s page is displayed within an embedded frame on the deposit page.
- New tab: The provider’s page opens in a new browser tab.
- Page: The provider’s page is shown in the entire browser window.
Allow APM for
Define whether to display the current APM on the deposit page based on customer deposit history:
- All deposits: Display the APM for all customers, regardless of their deposit history.
- First-time deposit (FTD): Display the APM only for customers making their first deposit.
- Repeat-time deposit (RTD): Display the APM only for customers who have previously made a deposit (i.e., not their first deposit).
Allow for source
Determine the platforms on which the payment provider can be utilized. For example:
- All (mobile app, web, mobile web, back-office): Enables the payment provider across all platforms.
- Web, mobile web: Enables the payment provider on web and mobile web platforms, making it inaccessible to mobile app and back-office users.
Anonymize customer data
Specify whether Cashier should anonymize customer data before sending it to the payment provider. You can select one of the following options:
- All: Both the phone number and email address will be modified.
- Email: The email address will be modified.
- Phone: The phone number will be shuffled.
Allow for KYC status
This setting maps statuses between the client CRM and the Cashier system. The mapping can be customized to fit the specific needs of the CRM.
2. Countries
Specify the countries where the APM is allowed to process transactions. By default, all countries are enabled.
3. Supported currencies
Set the currencies that the APM can process. By default, all currencies are supported unless custom currencies are specified.
4. Currency converter
The currency converter allows you to set up specific rules for converting currencies between the currency of your products, services, and items (currency from) and the APM’s currency (currency to).
This feature is available for both PSP and APM providers. Set it up individually for each payment provider.
To add a new currency conversion rule, click Add Converter Rule button in the top right corner.
A blank row will appear in the main area with the following parameters:
For more information about these parameters, see the Accessing PSP advanced settings section.
5. Limitations and payments
On this page, the following limits can be configured:
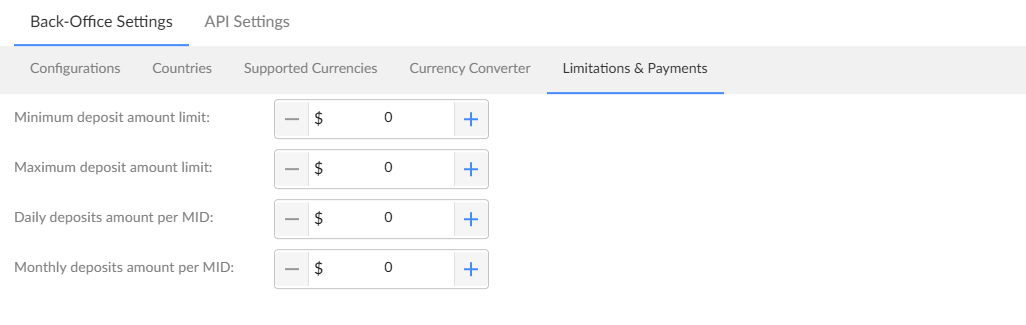
The limits can be configured independently, but validations are in place to ensure correct settings and prevent misconfigurations.
- The minimum deposit amount limit must be less than or equal to the maximum deposit amount limit.
- The maximum deposit amount limit must be less than or equal to the daily deposit amount per MID.
- The daily deposit amount per MID must be less than or equal to the monthly deposit amount per MID.
- A value of 0 means there is no limit set.